The new hot thing in Nordic is nRF Connect SDK and VS Code Extension. How do you install it? Follow this Nordic video series: Installing nNF Connect. Why am I blogging about it? Because I “chose unwisely” and also the Segger driver did not install completely correctly.
Choosing Wisely
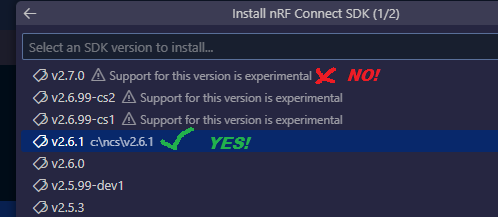
When installing nRF Connect SDK (After installing the Extension Pack in VS Code), you get choices. Now most folks today feel there are just too many choices out there, and this applies to the SDK. I went with the latest version (2.7.0 at the time), ignoring the little triangle explanation point warning ”Support for this version is experimental”. This lead to 45 minutes of “why won’t the sample project build”. Then some more time repeating the installation on another computer and, noticing the little warning sign, choosing v2.6.1 (the latest production release). Presto! The sample project built. So I went back to the first PC, swapped out the 2.7.0 for 2.6.1 with the same successful result.
Bulk Interface?
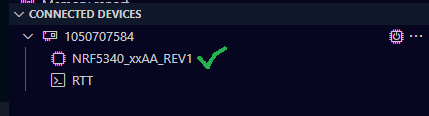
Next it was time to download my newly built sample to my Nordic dev
board. Alas the board was partially recognized (two COM ports showed
up in VS Code under “Connected Devices), but you’re supposed to see
the chip name (NRF5340 in my case). This lead to some Googling;
various chatting; Device Managering; finally concluding that the
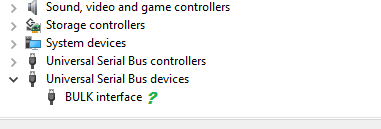
Segger driver was not installed properly after seeing a post I can’t
find anymore that said “J-Link” should show up under Device Manager
→ Universal Serial Bus Devices. Ok, I thought, I’ll just delete
any current J-LiNK driver installed during the Nordic tool setup and
go download the latest here:
Segger Downloads
So I did. And then I did get “J-Link” showing up as a USB
Device, and it programmed! But after a reboot, it changed to “Bulk
Interface”, but it still worked! So who cares!
Success.